| Tom Fisher's Saturn Alternator Conversion | |||
|---|---|---|---|
Page 1 |
Page 2 |
||
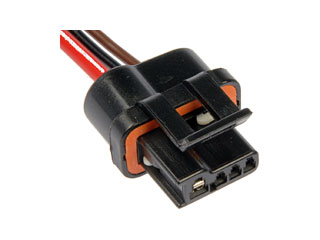
I just completed the upgrade and the results are excellent. My red idiot light now doesn't come on during low rpm like it used to. Basically, this consists of replacing the original Lucas alternator with a remanufactured unit for a 91-94 Saturn. Of course, it's not just a simple "plug & play" as some modifications to the Saturn unit are first necessary. I purchased my Saturn unit from Advance Auto Parts. The Advance Auto part number is P81073. The price is about $90 plus you'll have to pay the $30 core charge since they won't take your old Lucas unit in trade. Also the replacement plug is a 3-wire GM Regulator Module Harness #85854 (costs about $7.50). Here's what the #85854 plug looks like:
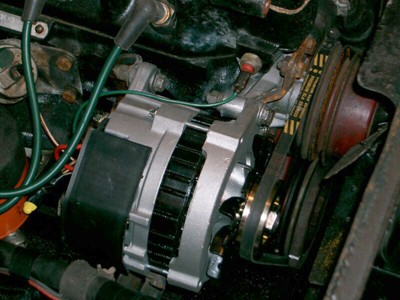
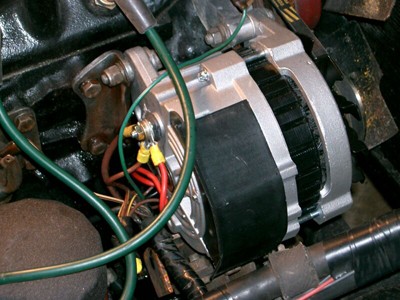
As for any concerns about whether the alternator is non self-exciting or not - don't worry about it. Just get the P81073 - it will work fine. I sent an email inquiry to a tech person at Advance Auto about that and the answer I got back was more confusing than you can imagine. It actually led me to believe that not many people really understand what non self-exciting vs self-exciting alternators are all about. I think it would also be helpful to note that taking the pulley off the new unit (to replace the pulley and rotate the housing 120 degrees - NOT 90 degrees as stated in some instructions - clockwise) is no small task and requires a Torx socket and an air impact wrench as well as some know-how about using a woodruff key to keep the alternator shaft from turning. As previously stated, having an auto electric shop do all this is highly recommended. This cost me $41, alone, which might shock some people. But, the way I see it, why mess up something that cost you about $120 in the first place? I took the old Lucas unit with me when I made the arrangements for the shop to do the work. The Lucas pulley will not work on the Saturn unit as the hole diameters are different. But by seeing the old pulley, they quickly substituted an off-the shelf brass pulley that had the right hole diameter. And while they were at it, I had them rotate the front housing. There is a spacer that fits inside the top rear mounting hole of the alternator. This spacer will have to be ground down, some - otherwise the pulleys will not be aligned properly. Just grind some and then trial fit until you see the pulleys in alignment. After you get the unit in place in your engine compartment, make sure the belt is in place and taut - then tighten down the adjustable bracket that is on the lower front of the altenator. Now, all that is left is to hook up the wiring. But first, if you haven't already done so, remove the terminal connections from the battery in the rear of the car.
|
The replacement plug (which plugs into the alternator) has three wires coming out - a big red wire, a medium size brown wire, and a black wire. You might as well place some electical tape over the end of the black wire right away - it is not used. Now, the wires going to the old Lucas plug consist of a big brown wire, a medium brown wire, and three small yellow-brown wires. Now would be a good time to take some wire cutters and snip the wires from the old Lucas plug - simply cut them right where they enter into the plug. All wire ends can now be stripped of insulation about a quarter of an inch. Place ring connectors on the ends of the big red wire from the new altenator plug AND the two brown wires that came from the old Lucas plug. These three wires can now be hooked to the Battery post on the rear of the alternator. You are now left with the one brown wire from the new alternator plug and the three yellow-brown wires that came from the old Lucas plug - simply hook these all together which can be done with a twist connector**. I always place some electrical tape over a twist connector just to be safe and ensure that the connector will not come untwisted - but this is optional. Now hook the battery back up and you should be ready to fire the old girl up. All in all, my Saturn - MGB conversion alternator project cost me about $170. But I think it was worth every penny. ** For anyone wishing to get super technical, looking at the three yellow-brown wires that were in the original Lucas plug, two of them are only used as a jumper. In other words, one of the yellow-brown wires runs up into the harness and doubles back - it is really only one wire. If you take the time to hook an ohm meter up and find which of the two yellow-brown wires really is the single wire, you can eliminate that one from the final hookup with the new Saturn setup. In other words, there really is only one yellow-brown wire that counts - and it should be hooked to the brown wire from the new alternator plug. In my writeup, I simplified things by just instructing to go ahead and wire up all three of the yellow-brown wires to the brown wire. It doesn't hurt anything. Hope this isn't confusing. It sounds like some setups only have the one yellow-brown wire in the first place. If that's the case, they just hook it to the brown wire from the new alternator plug.
|
||
| Page 3 | Page 4 | ||
Anything that hasn't been covered? **Webmaster note My thanks to Tom for allowing me to reproduce his article here. Tom also suggests you check the links (below right) for a ready to install alternator. The link to his original site is here
|
|
||
| Page 5 | Page 6 | ||
|
Additional links for alternator conversions Converting from Generator to Alternator GM /Delco Alernator Conversion
|
||
1 wire alternator conversion(above), shown mounted on my 1275 Morris Minor Pickup (right) |
 |
||