| |
|
Engineering Report
Electrolytic Rust Removal
|
Engineer: Gary W. Treible SPI 0001
Date: 03/09/2003 David Bradley Manufacturing Company
Reviewed By: Vince Webster Approved By: Byron Aasland |
| |
|
| |
Background:
At a recent consignment sale held in south-central Pennsylvania, a Bradley collector (known to some as 'SPB') was leaving with his well rusted treasures. As he was making the 300 yard trek to his vehicle, a fellow collector shouted out "why don't you try electrolytic rust removal". SPB grunted and went on his way, but later, the possibilities of electrolytic rust removal (ERR from this point forward) were discussed. This report is the result of several hours of playing with rusted Bradley parts in my driveway (my neighbors are really patient people).
|
| |
| |
How It Works:
There are many good sites on the internet dealing with the chemistry of ERR, so I will list a few links here and not seek to duplicate that effort.
http://www.oldengine.org/members/billd/electrol.htm
http://www.holzwerken.de/museum/links/electrolysis_explanation.phtml
http://users.interconnect.net/nlindsey/rusty2l/electrolysis/electrolysis.htm
http://www.jefa.com/install/electro.htm
http://www.rowand.net/Shop/Tech/Electrolysis.htm
http://www.alphalink.com.au/~petero/rustconverter.html
This list is courtesy of SPB, if you like it, it was my idea, if not, call SPB late at night and complain.
|
|
|
My Equipment:
The equipment needed for ERR is simple, inexpensive, and safe. For demonstration purposes, I used a small plastic mop bucket as a container. For the sacrificial electrode, I used a Danish Butter Cookie can and attached a steel strap to one side so I could keep the terminal of my battery charger out of the electrolyte. The can has the benefit of having a large diameter base and sides. This is important as the reaction is basically 'line of sight' through the electrolyte.
The electrolyte was made using hot water and Arm and Hammer Washing Soda. I used hot water, based on my belief that heat is a catalyst for most chemical reactions. I have no idea if that really helped. It took only a small amount of washing soda to turn the water totally white. I sank the butter cookie can into the pail full of electrolyte and attached the POSITIVE terminal of my battery charger to the external strap. The electrolyte is totally safe, since it's actually just soapy water.
The part to be de-rusted was then connected to the NEGATIVE terminal of the battery charger, and placed in the the electrolyte in the center of the submerged can. The relative position of both electrodes needs to be fixed, as, should they contact one another, bright blue sparks are created in the electrolyte (bad!). I used a 2 by 4 positioned over the bucket, and a 'C' clamp to hold the part being cleaned.
For the battery charger, I used my Schumacher 'starting' charger. I tried various settings, but found I got the highest current on the 'starting' setting (duh!). I experimented with various concentrations of the washing soda, and did not see any difference in current flow. Typically, my charger delivered about 8 to 10 amps to the process. This is enough to actually heat the water (12V at 10A = 120Watts). This time of year, the electrolyte steams in the bucket.
The Test:
I figured there was no point in doing a 'typical' rust removal test. Instead, I choose a severe (read ridiculous) test.
Recently I acquired a tractor with a southern cultivator that had been left to sit in water for decades. The shovels were so badly rusted they were flaking. That, I decided, would be my test. One complete shank was removed from the frame and clamped to the 2 by 4 as described above.
Once everything was good to go, I turned the timer on (my charger has a mechanical charge timer) and watched for the reaction. Almost immediately, a storm of white bubbles began to surface from around the cultivator shank. As mentioned earlier, the battery charger ammeter read about 8 amps. I watched this for awhile, and left it for about 15 minutes. When I returned, the electrolyte was totally (rust) brown. This does not affect the process, and the electrolyte can be saved and reused. I dumped mine down the storm drain (it's just soapy water, eco friendly).
|
|
| |
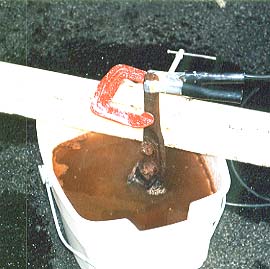 |
Bubble, bubble toil and trouble! Here is the chemistry experiment in all it's glory. You can see the cultivator shank clamped to the 2 by 4, with the battery charger negative terminal attached. The white powder on the 'C' clamp is additional washing soda I added in the concentration tests. Believe it or not, the water is still pretty clean in this picture!
|
|
| |
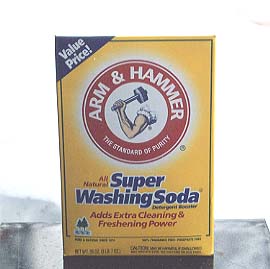 |
This is the stuff for making the electrolyte. It produces a very mild basic solution. You can also use household lye, but hey, when this stuff is 'value priced' how can you go wrong.
|
| |
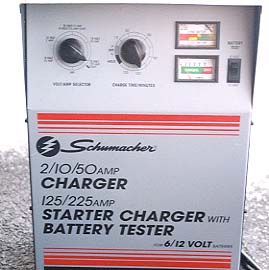 |
Oh, you mean the Charger? That has a hemi too.
Actually this one plugs into the wall. The left hand selector is on the 225A start setting. The timer knob is indicating about 120 minutes. The upper gage is indicating voltage, the lower one, amps. Smaller chargers would work just as well, but might take a little longer, as it's current that does the work.
|
| |
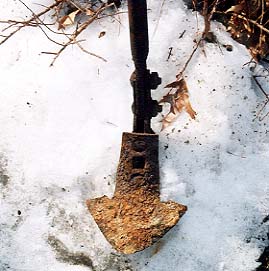 |
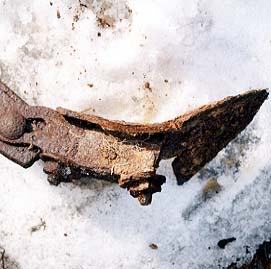
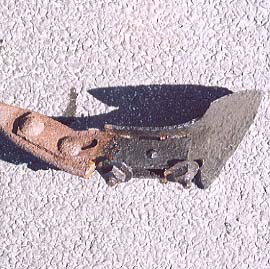
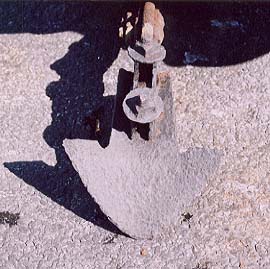
The victim, a severely rusted cultivator shovel. The guys that were at Bielers can attest to it's rustiness. Put it this way, if you saw it on the sidewalk you'd walk around it!
|
|
| |
 |
The back side, roots and all. Notice the lack of definition of the nuts. Particularly the lower one.
|
| |
 |
Side view, showing the flaking of the layers of rust.
|
| |
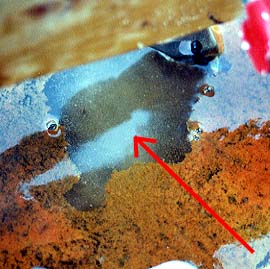 |
Here is a shot of the process in action. The white area, pointed to by the arrow, is the bubbling action from the de-rusting process. Supposedly it's hydrogen and oxygen gas. Do this in a well ventilated space. "Oh, the humanity...." *
* Vague Hindenburg reference
|
| |
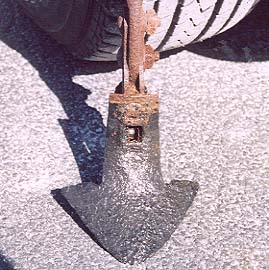 |
After about 5 hours, this is the result. There is a slimy black film on the part, that will wash off with a brush and soapy water. I'm not sure you need the soap, but that's what I used. As you can see, the process has performed something of a miracle, but it does not fill in pits. If the metal is gone, it's gone.
|
| |
|
Here is the back view before cleaning. Notice the definition of the square nuts.
|
| |
 |
The side view before cleaning. Compare these with the 'before' pix!
|
| |
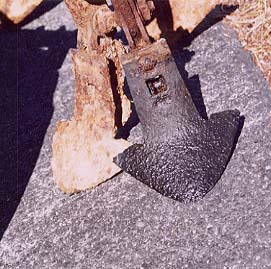 |
Here is a comparison with one of it's 'brothers' from the same cultivator.
|
| |
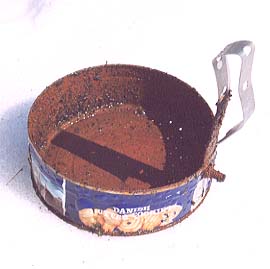 |
RIP! This is the sacrificial electrode. As you can see, the butter cookies are gone, as is the plating, parts of the label, and lots of metal.
|
| |
|
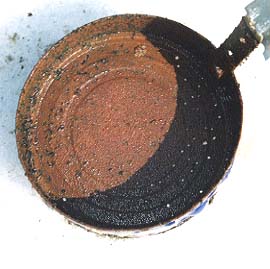 |
Top view. The white specks are holes through the bottom of the can. They are all through the bottom, but just show up in the shadow portion in this picture.
|
|
| |
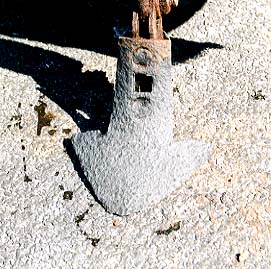 |
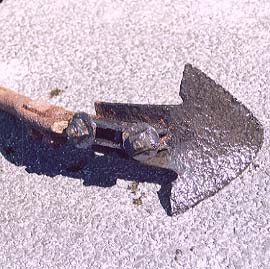
The shovel cleaned and dry. It takes on a dull metallic gray color. Rust not removed is easy to see, as it remains brown.
|
|
| |
 |
Back side. Look at those nuts and bolts.
|
| |
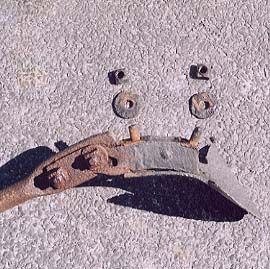 |
WOW!! Supposedly this process makes taking rusted fasteners apart easy, so I tried it. I put the shank in the vise, and squirted a small amount of Liquid Wrench on each nut. It took some force with a 14" adjustable wrench (the nuts are undersized after de-rusting), but BOTH nuts turned off. Here you can see the washers and the remaining threads on the bolts. Nothing was broken or twisted off!
|
| |
 |
No Stephanie! No disassemble! Here is the separated shovel and fasteners. The bolts could be reused, but they're pretty tired.
|
| |
| |
| |
Conclusion:
I was impressed! I've used Naval Jelly for years. That's caustic, smelly, expensive, and doesn't do nearly as good a job. This process is easily scaled up for doing bigger jobs. I'd like to get a cast iron kettle, or better yet, an old cast iron bath tub with the enamel removed (my neighbors are really smiling now!). Ideally, the electrode should be stainless steel. Supposedly stainless is not consumed by the process like the butter cookie can was. Finally, the ability to do large parts, makes this process competitive with sand blasting. As for total rust removal, (I can see Dave Phelps frowning) painting and time will tell. I was pretty satisfied with the sample I did, but rust is insidious, and it usually wins.
Thank you for visiting my Electrolytic Rust Removal Page!
Gary
|
|
|